Showing posts with label easy dessert. Show all posts

Tuesday, August 21, 2012

Chocolate Pots de Creme - Tasty Tuesday!

Today is the first day back to school for the wee ones.  So the first thing I did after the bus picked them up (21 minutes late)?  I made chocolate pots de creme.  No, this isn't because I'm going to spoil myself - although the egg white omelet with smoked salmon and goat cheese that I'm going to make myself for lunch shortly might make you think otherwise - but because a friend has a birthday tomorrow.

And she's never had pots de creme before.

Well, ok, really this came about because when I was at her house on Sunday, she loaded me down with organic milk and cream from her neighbor that was about to go bad, and she wasn't going to use it.  Her only request was that if I made whipped cream or something yummy with it, that I allow her a taste.  Since her birthday is tomorrow, I promised to make her something yummy.  After throwing out a few suggestions, I mentioned the pots de creme, and she got a blank look on her face.

After explaining that it's a delicious yummy French custard, she was sold.  She didn't even let me finish my explanation.  So tomorrow, she's coming over, and we're going to eat our pots de creme.  That's why I put them in my extra large ramekins (what, you don't have three sizes of ramekins at home?) and only made a half recipe, which gave me four pots de creme.  So I can pretend like I'm spoiling my husband by surprising him with some tonight, too.   I'll just have to wait until the wee ones are in bed, as I know Mister Man - and he'd want his own, but I'm not sharing!

Easy custard cooked in ramekins

Chocolate Pots de Creme

Ingredients:
4 c heavy cream
7 egg yolks
1/2 c sugar
1 T vanilla bean paste (my new favorite thing ever, but use a 1:1 replacement of vanilla extract if you don't have any... yet)
1 t espresso or java extract
1/2 lb bittersweet chocolate

Directions:
Preheat the oven to 350 degrees.  Place the cream into a heavy pot and scald it - heat it over medium until it starts to steam and a light skin forms atop.  You don't want to burn it, so watch this.  While you're doing that, chop your chocolate and add it to another heavy pot and heat it on low until it melts.

Cream is not boiling, just little bubbles and steam

At the same time, whisk the egg yolks in another bowl.  Add the sugar, espresso, and vanilla and whisk until light and fluffy.  Note that it will be brown and not your usually light yellow.

When the chocolate is melted and cream scalded, pour the cream slowly into the chocolate.  Add a little cream and stir until it's incorporated and continue to add the cream until it's all in the chocolate.  This is one time where you don't want to scrape the bottom of the pan.  If there is any burned cream, that's where it will be.  Yuck.

Now you'll do the same to the eggs to temper them.  Using a measuring cup, add a little of the chocolate cream mixture to the eggs while whisking to ensure the eggs don't scramble.  Add a half cup or so in total, which will bring the eggs up to temperature.  At this point, you flip.  While whisking, pour the eggs into the chocolate cream and keep whisking until they're fully incorporated.
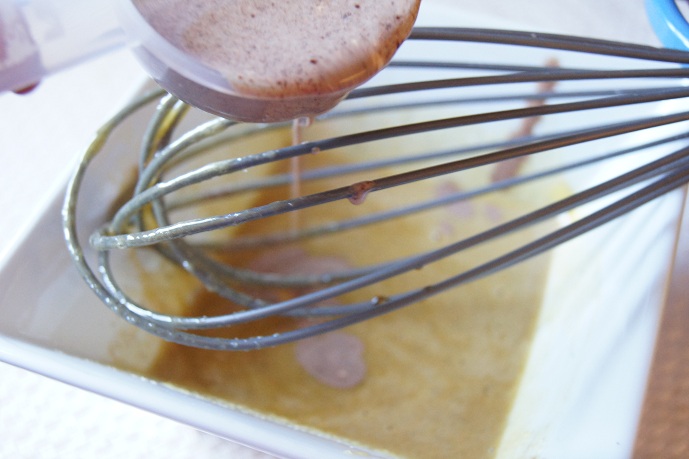
Pour hot liquid slowly into eggs while whisking

Place your ramekins into a baking dish.  Using that same measuring cup (yay, no extra mess), scoop out the pots de creme mixture evenly into the ramekins.

Use a measuring cup to get liquids into the ramekins

Place the baking dish into the oven, and using a liquid measuring cup, pour water around the ramekins - careful not to get any in - until the water is about two-thirds of the way up the sides of the ramekins.

The pots de creme need a water bath about two-thirds up the ramekins

Bake the pots de creme at 350 degrees for 25-35 minutes (or a little longer if you make them extra big like I did).  When they are set on top but still jiggly in the middle, they are done.  Let them cool, then place in the fridge until you're ready to enjoy them.  All I'm missing is a little vanilla bean whipped cream and some chocolate shavings.

Enjoy this and more with Blessed With Grace and Tempt My Tummy Tuesday.

Tuesday, June 12, 2012

Vanilla Orange Bars–Tasty Tuesday!

I had a movie party in my house last week.  It was part of a sponsored event, and so of course I had to provide food.  Because this is me.  And I cook and entertain all the time – and I love doing it.  Since I had purchased cereal as part of my food donation (you’ll have to read about what we did – I thought it was pretty cool and we’re going to do it again later this summer), I wanted to make a dessert with a cereal I had purchased to sort of tie the whole thing together.

Have I ever mentioned that I love recipe searches?  While I rarely am able to actually follow a recipe verbatim, it often gives me all sorts of great ideas – or drives me batty when I have a concept in my head and no one has ever done anything like it so I have to do it on the fly and hold my breath.  As I searched through recipes on the Post site, I found a few that looked good… but the vanilla orange bars were the ones that finally pulled me in.  Of course I had to alter the recipe… because that’s who I am, but oh did it turn out yummy!


Vanilla Orange Bars

Ingredients:
2 c Honey Bunches of Oats with Vanilla Clusters, divided
1/4 c butter
1/4 t nutmeg
1 package neufchatel (or use regular cream cheese, but the neufchatel is lower fat naturally so doesn’t taste plastic-y), at room temperature
1 c sugar
1/2 t vanilla (I used my new vanilla bean paste – SO yum)
2 eggs
2 T flour
1/4 t baking powder
1/2 t salt
1/4 c orange juice

Directions:
Preheat your oven to 350 degrees and grease an 8x8 glass baking dish.

In your food processor, grind 1 3/4 cups of the cereal until it is just crumbs, along with the nutmeg.  If you don’t have a food processor, put it in a bag and whack on it until it’s just crumbs – great for getting our your frustrations!  Melt the butter, and mix the two together until the cereal is completely coated with the melted butter; it will get there, although at first it looks as though there isn’t enough butter.  Pour the cereal mixture into the 8x8 pan and press it firmly together to make an even layer.  This will be your crust, so you want it packed in pretty well.

In a separate bowl, mix together the sugar and the soft neufchatel until creamy.  If you don’t have the cream cheese at least a little soft and do this step, you’ll end up with lumps later.  Add the eggs one at a time, beating thoroughly between the additions.  Add the orange juice and mix until blended.  Pour in the salt and baking powder and mix thoroughly before adding the flour.  Once it’s all incorporated, pour the mixture atop the crust you made (you still have 1/4 cup of the cereal in reserve – we didn’t forget about it).

Bake the “cheesecake” for 30-35 minutes, until the center is set – basically until it doesn’t jiggle like liquid anymore.  The edges of the dessert may be turning golden by this time, but that’s ok.  As soon as you take the bars from the oven, gently press the reserved 1/4 cup cereal into the top of the bars.  Let it come to room temperature, then refrigerate for 2-3 hours before cutting and serving.  Another reason this is a great party dessert?  It’s a must make ahead item!

Cut into small squares, as these are fairly rich, and serve.  Keep this in the fridge.  They are best in the first 1-2 days, as the cereal topping will get soft, but that’s only if you’re able to have them stick around that long!


Enjoy this and more with Blessed With Grace and Tempt My Tummy Tuesday. Also posting now with A Southern Fairytale and her Mouthwatering Monday.

Tuesday, April 17, 2012

Tasty Tuesday! - Homemade Vanilla Pudding

For Easter, I was in charge of dessert. And because I'm a nice mom (every once in awhile anyway), I let the wee ones choose what to make. They decided on cookie pizza. It isn't the most traditional Easter dessert, but I want them to be invested in what we make and eat - so cookie pizza it was. I made a dairy free version of it for Little Miss and a dairy filled version for us.

As the dairy version was baking, I realized we needed to run to open gymnastics with the wee ones, so I set the oven to stop cooking ten or so minutes before it was scheduled to be done, figuring that it would be cooked pretty close to perfectly. When we arrived home after the hour and a half open gym, the oven was still on. Uh-oh. While they were miraculously not burnt, the cookies were very very crispy. I audibled and decided to make a trifle instead, figuring that the pudding would offset the overly crispy cookie. At least a little. Fortunately, it worked.

The focus for this week's Tasty Tuesday? The delicious homemade vanilla pudding I made. This recipe is perfect for an after dinner dessert for a family - and yes, it's good served warm, too. For the trifle, I doubled the recipe to ensure I had enough to cover the cookie layers. I also mixed in a small handful of chocolate chips (the good chocolate kind) into the warm pudding just before layering it, which made for a chocolate swirl pudding that was beyond awesome just by itself.


Homemade Vanilla Pudding

Ingredients:
1/4 c sugar
2 T cornstarch
1/4 t salt
2 c milk (NOT skim, please)
2 egg yolks, beaten
1 T butter
1 t vanilla

Directions:
In a saucepan, mix together the sugar, cornstarch, and salt. Turn the heat onto medium, and slowly add the milk while whisking the sugar mixture. Cook until it starts to bubble and get thicker, stirring periodically.

Reduce the heat once it starts to bubble gently, and stir constantly for two minutes to ensure nothing scorches on the bottom. Remove from the heat after the two minutes are up.


Beat the egg yolks in a small bowl. Add a spoon of the milk mixture at a time, continuing to beat the egg yolk with a fork while you do so to ensure that the egg doesn't cook. Once the bottom of the bowl starts to feel warm in your hand, you have added enough milk to temper the eggs (my very unscientific method, but it works!).


Slowly pour the tempered egg yolks into the milk mixture, whisking the milk constantly. Return to medium heat, stirring constantly. Once it begins to bubble gently again, cook for one more minute - continuing to stir. Remove from the heat and add the butter, stirring until it's melted and incorporated. Add the vanilla, and do the same.


Let it cool on the countertop for 15 minutes, stirring periodically. At this point, place a piece of plastic wrap over the pudding, which will help prevent a skin from forming on it. Chill in the fridge for an hour before serving. Assuming no one eats it all, this will last four or five days in the fridge.

Note: After the fifteen minutes, I added the handful of chocolate chips and placed the pudding on my cookie layers so that the cookies would better absorb the moisture from the pudding; had the cookie not been so crispy, I would have waited until the pudding was fully cooled so that it didn't make the cookies mushy.

Enjoy this and more with Blessed With Grace and Tempt My Tummy Tuesday. Also posting now with A Southern Fairytale and her Mouthwatering Monday.

Tuesday, April 10, 2012

Tasty Tuesday! - Chocolate Fondue

So last week, I talked about the "Moms Need Spring Break, Too!" party I had for some of my friends at the end of spring break when we all needed a bit of our own break and celebration. I made it a fondue night, with some other goodies, of course. I don't have much of an excuse to make fondue, but I love it. I already posted my traditional cheese fondue recipe and this week, it's time for my chocolate fondue recipe.


Chocolate Fondue

Ingredients:
1/3 c heavy whipping cream (avoid the ultra-pasteurized, if you can - it doesn't taste the same)
8 oz good quality dark chocolate, chopped (this is the time to pull out not just your 72% cocoa chocolate but the 75% or 80% if you have it)
3 T Grand Marnier
zest of one orange

Directions:
Heat the cream in a heavy saucepan gently. You want to scald it, which means that it is just starting to steam but doesn't actually boil. Boiling cream is bad; trust me on that one. Place the chocolate, orange zest, and Grand Marnier in a separate bowl. Once the cream is gently steaming, pour it over the chocolate and stir until the chocolate is fully melted.


If you don't want the orange flavor, you can skip the Grand Marnier and orange zest and use something else - lemon zest or kirsch or caramel or strong coffee or amaretto or raspberry or Bailey's. You'll find a good combination.

Serve the chocolate fondue with assorted fresh fruit, dried fruits, pretzels, pound cake cubes, marshmallows, or anything else that sounds good to you. If you have leftovers, you can refrigerate this and gently reheat it later either in the microwave (low heat, stirring every 30 seconds) or on the stove, stirring constantly until it is mostly melted before removing it from the heat and stirring until the rest has melted and incorporated.


Enjoy this and more with Blessed With Grace and Tempt My Tummy Tuesday. Also posting now with A Southern Fairytale and her Mouthwatering Monday.

Tuesday, February 28, 2012

Tasty Tuesday - Cherry Bliss Bites

So you may have noticed that my blog has been quiet for a few days. If you didn't know, I've been at Blissdom in Nashville, and I have a ton to say about it, but I'm still recovering. You don't want to see the laundry pile I have yet to complete. Before I left, however, I made a special treat to share while I was at Blissdom.

This is a recipe I received from a friend a few years ago and made regularly for awhile but haven't made in at least two years and probably longer. Shame on me. Or good for me - because they are awfully good. I think I still have two or three left right now, but not for long! These little brownie bites with a secret cherry in the center are awesome - and super easy to make!

Cherry Bliss Bites

Ingredients:
2 c flour
2/3 c cocoa
1/4 t baking powder
1/4 t baking soda
1/2 c butter
1 c sugar
2 eggs
1 1/2 t vanilla
1 jar maraschino cherries
12 oz chopped chocolate (or chocolate chips)
1 can sweetened condensed milk (not evaporated milk)
10 T maraschino cherry juice, reserved from the jar

Directions:
Preheat your oven to 350 degrees.

Cream the butter and sugar. Add the eggs and vanilla and mix until well combined. Add the baking powder, baking soda, and cocoa and stir until well combined. Add the flour and stir until just mixed.


Scoop out about a tablespoon or a little more of the dough (I use my small cookie dough scoop for this one) into an ungreased small muffin tin. Trust me, for some reason, these release far better from ungreased pans than from greased, and I've tried both ways.


From there, you need to form it into little tarts. I have a cool little wooden tool I picked up somewhere that is designed for this, but you can also use your thumbs, which is what I did before I had this tool. Whether it's your thumbs or a special tool, simply dip into a little flour, shake off the excess, then press down to make a hole in the center. Dip and repeat until you've created all your crusts.


At this point, remove your cherries from the jar, but save the juice! If you have lots of cherries (e.g., my Costco sized jar), start placing a cherry into each crust. If you have a smaller jar, cut each cherry in half or go buy another jar. Yes, I did call my husband at his basketball game and ask him to pick me up a new jar.


Now you're ready for the last step, which is making the fudgy center. Yum. Melt your chocolate with the evaporated milk in a heavy saucepan on low heat. It won't take much to melt, and you don't want to burn it. I usually start this step after I've dropped my crusts into the pan, and the timing works out well. Once the chocolate is completely melted together - stir it occasionally while it's melting - add 10 T of the cherry juice and stir gently until it's incorporated. At first, the cherry juice will resist, but it will come together if you give it a minute or two.


Using a spoon, pour enough of the fudgy mixture over each of the cherry bites to cover the cherry. I always have extra left over when I make these, so don't feel like you have to hold back and skimp on the fudgy goodness for each bliss bite.


Place the tins into a 350 degree oven for 12-14 minutes. Let them cool completely before removing them from the muffin tins. I find that freezing brownies makes them extra chewy, so I usually freeze mine - outside in the winter - then pop them from the tins. These will keep for up to a week in a sealed container on your shelf. If they last that long, that is...


Enjoy this and more with Blessed With Grace and Tempt My Tummy Tuesday. Also posting now with A Southern Fairytale and her Mouthwatering Monday.

Tuesday, February 7, 2012

Tasty Tuesday - Dulce de Leche Cheerios Bars

Little Miss has a bake sale at her school on Friday. I love that they still are able to do bake sales of homebaked goods. I am, of course, baking for it, and I finally figured out yesterday what I'm going to make for it. I was sent some Dulce de Leche Cheerios and decided to bake with them because there are some pretty awesome looking recipes out there.

Of course, I had to adapt the original recipe because that's what I do. I was happy that I had all the ingredients for it in my pantry. Well, mostly. And as I made it, I didn't like the proportions they used (to be honest, I think the recipe is off a little bit as written on the site). And yeah... they turned out pretty well. They were super easy and quick to make and are one of those recipes where you can change it up to fit your needs and what you have in your pantry without worrying a ton about measurements.


Dulce de Leche Cheerios Bars

Ingredients:
1 sleeve graham crackers, plus 2 extra - crushed (a little over 2 cups)
1/2 c butter, melted
2 c Dulce de Leche Cheerios
1 1/2 c pretzels, crushed
1 1/2 c milk chocolate chips
1 1/2 c semi-sweet chocolate chips (or white chocolate, yum!)
3/4 c shredded coconut
1 can (14 oz) sweetened condensed milk

Directions:
Crush the graham crackers into large crumbles. I love using my food processor because it's fast and easy. Just make sure you pulse it and don't simply turn it on, or the crumbs will be way too fine. I break them into quarters before starting the food processor to help break them up quickly and evenly. You could also put them in a bag and just smash them there. Add the crumbs and the melted butter into a 13x9 pan and mix together until it's all incorporated, then press into the bottom of the pan. (Seriously, why dirty another bowl? <- my motto in life)


Crush the pretzels in the same manner. Add half the pretzels to the top of the crust. Add half of each type of chocolate chip and the Cheerios, then add the remainder of the Cheerios, pretzels, and chocolate chips before dusting with the coconut. The good news is that the exact amounts aren't particular. In fact, it's possible that I didn't measure at all but just estimated. And it totally worked.


Pour the can of sweetened condensed milk over the pan, covering it equally. You won't be stirring it at all, so do your best to spread it out by pouring it evenly across the top.


Bake at 350 degrees for 25 minutes until golden brown. Let it cool fully, then cut into squares. Make sure you've run a knife or thin spatula around the edge of the pan to help release the squares before you try to remove them. Yum.


I have several giveaways going on now at Honest and Truly Reviews. The one I'd most love love love you to enter? A $25 American Express gift card giveaway. Pretty please go enter?

In the interest of full disclosure, the original recipe appeared on the Betty Crocker website, with significant alterations from me. The Cheerios were part of a sample I received courtesy Cheerios and General Mills via MyBlogSpark.

Enjoy this and more with Blessed With Grace and Tempt My Tummy Tuesday. Also posting now with A Southern Fairytale and her Mouthwatering Monday.

  © Blogger template 'Solitude' by Ourblogtemplates.com 2008

Back to TOP