Wednesday, November 28, 2012

I Put On My Big Girl Pants

So I can't believe I almost forgot to tell you.... you know how I've been talking about moving to a self-hosted blog for well, forever?  I finally actually did it.  And it was so much less painful and scary than I had made it out to be in my head.

I'm still working out the kinks and unpacking and updating over there, but go check out Honest & Truly!  I've started posting there already, so scoot on over.

You'll have to resubscribe to a new feed, but I have all my social media buttons on the site and easily accessible.  While you're at it, follow me on Twitter.  And like my Facebook page.  And follow my boards on Pinterest, too.

And give me your honest thoughts on the new blog... I really want to know!

Tuesday, November 27, 2012

Favorite Yellow Cake - Tasty Tuesday!

My birthday was Saturday.  And if I want a cake, I have to make it myself.  Since I was already making chocolate chip cookie cupcakes for a friend's daughter's birthday party, I wasn't feeling super creative on what I wanted for myself.  I just wanted something I knew I could make easily to take to the Northwestern tailgate.  The answer is deliciously simple: my favorite yellow cake.  It's super quick to throw together, and it tastes so good!

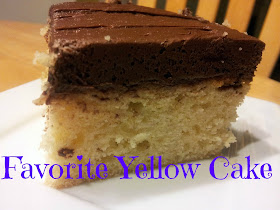
Slice of yellow cake with mocha frosting

Favorite Yellow Cake

Ingredients:
1 c butter, at room temperature
1 1/2 c sugar
4 eggs
3 c sifted flour
2 1/2 t baking powder
3/4 t salt
1 c milk
1 t vanilla extract
1 t almond extract  (if you have none, go with 2 t vanilla)

Directions:
Preheat your oven to 350 degrees.

Prepare your pans either by using the lazy man's way out (Pam) or butter and flouring them.  You can use a 9x13 pan or 3 9 inch rounds.  Guess which I usually do....

Beat together the butter and sugar until they are fluffy and lightened in texture, just as you do with most recipes.  It is important that the butter be room temperature.  When it's cold, it doesn't fluff as well, and you don't get the same light texture to your cake.  Trust me.

Add your eggs one at a time.  Beat well between each addition.  You want the light texture from your eggs, too, but you don't want to overbeat these, so don't leave your mixer on for minutes at a time.

Add the salt and baking powder, mixing well.  Add 1 cup of the flour and stir gently.  This is when I stop with the electric mixer and move to a large spatula to ensure I don't overmix the batter, which results in bubbles in my cake and a too dense, crumby texture.  Add half the milk, as well as the vanilla and almond extract.  Mix with your spatula until incorporated, stirring from the bottom to the top.  Add another cup of flour, stirring again.  Add the remaining milk, stir.  Add the last of the flour and stir until just combined.

Pour your batter into your prepared pans.  Bake in the 350 degree oven for 24 minutes for the rounds or 30-33 minutes for the 9x13 pan, testing to ensure the middle is baked before removing the cakes.

Let cool for ten minutes in the pan, then turn out to a wire rack to cool the rest of the way.  Frost as desired and eat within a day or two.  I made a mocha frosting for this that was awesome.  It's super easy to make frosting and so forgiving.  One day I will make a video showing how to rescue frosting from various issues because no matter how much I've accidentally put in too much milk or powdered sugar or whatever, I can always bring it back to a wonderful frosting - and you can, too, if you have the confidence.

Mocha frosting?  A little espresso, half a stick of butter, half a cup or so of cocoa powder, a couple tablespoons of milk, and 2-3 c powdered sugar.  Mix together the butter and sugar, add the milk, add the cocoa powder and espresso and mix again.  Then beat until it's fluffy.  Adjust your ratios until you like the texture, then frost immediately.

Oh, and then sing happy birthday to me.  Loudly, please.

Enjoy this and more with Blessed With Grace and Tempt My Tummy Tuesday.  Rachel from A Southern Fairytale has an awesome Mouthwatering Monday linkup that I participate in, too.

Monday, November 26, 2012

Stay Debt Free Over The Holidays

It's already Cyber Monday, and I've heard nothing on the radio today but about how much money people are going to be spending today - an estimate of over $1.5 billion - and more to come.  With the most possible shopping days before Christmas, retailers are exhorting people to make the most of them.  And making the most of them is going to put a lot of people into unnecessary debt.

My gift to you this year?  My suggestions and tips on how to avoid sliding into debt over the holidays.

Avoid holiday debt

1. Holidays are about people - or should be.  Have conversations with your family about what really matters to you and what you want most.  Explain to your son that this year you won't be buying a new video game console, but you'll offer $25 or $50 towards buying it.  Discuss with your spouse whether you really want to exchange gifts or maybe set strict spending limits - and stick to them.  Explain to your kids that they will receive fewer gifts this year because the focus is shifting.  The wee ones know that Jesus got three gifts, and they get three gifts.  And they're fine with that.

2.  With extended family members or groups of friends where you regularly exchange gifts, have a similar conversation.  Do you want to exchange gifts?  Can you maybe simply purchase gifts for the kids and not the adults?  What about drawing names and buying one gift for someone in the group instead of each buying a gift for every person?  Have you ever though of doing a white elephant exchange with a $5 or $10 limit?  They are so much fun.

3.  Don't add anyone else to your gift giving list.  I know you love you new best friend or there's someone who you could start the gift exchange with, but ... don't.  In all likelihood they need a gift from you just as much as you need one from them, so save the cash on both sides.  Go out for a drink or dinner instead.  Bake cookies and share them.  But don't start giving more gifts if you can help it.

4.  Don't just spend money, raise it.  If I look around my house, I see so many things that I no longer need or want - from gifts that people gave me to books the wee ones no longer read to clothes they've outgrown to kitchen gadgets I don't use.  The season for garage sales is over in Chicago, but Craigslist is your friend.  So is eBay.  And I told you about the awesome Buy/Sell/Trade groups on Facebook.  If you're going to spend money, make sure you have it.

5.  Speaking of those gifts people gave you that you've never actually opened or used... regift.  I have no issues receiving an item that someone else received as a gift that didn't fit for them so long as it is a good fit for me.  If you don't cook and received an immersion blender and need to get me something, pass that sucker along.  No one will know - or care (or if they do, shame on them) - and this is a great way to upcycle items that are otherwise just taking up space.

6.  Put away the credit cards.  This one is an obvious one, I suppose.  It's really easy to forget how much you're spending when you don't have to open your wallet and remove the green.  In fact, figure out how much you can afford to spend, put it in an envelope marked "Christmas money" and use that to buy everything.  If you run out, you're done.  And if you have some left over, deposit in the bank.  It is not a windfall.  It's your hard earned money that you can use for something else you really need later.

7.  Create your own gifts.  Giving the gift of time or talent is wonderful.  So many of us have more than we need.  Instead of another... thing, give people you.  Create a gift certificate for an hour of organizing or a home cooked dinner or babysitting or three hours of window cleaning or anything that you can do that your recipient would appreciate.  Maybe it's a date to the movies.  Maybe it's reading to your niece before bedtime.  Those are the gifts that people remember fifteen years from now.  Those are the ones I want to receive.

8.  Buy the large gift baskets and split them up.  I do this all the time, especially for gifts I need to purchase for teachers and therapists where all of a sudden, I have to purchase 11 more gifts for the people who do so much for my children.  If I buy a large gift basket, I suddenly have a bunch of gifts that are much cheaper than they were individually.  And they are often pre-wrapped very prettily, which saves me time.

9.  Search for coupons for every item you want to buy.  It's amazing what's out there.  I was looking for a Black & Decker smart battery charger (or something similar) for my car the other day.  I first found one for $157.  After searching and coupons, I managed to bring the price down for the same model to $84.53.  Search.  Whether you're buying offline or on, search for a coupon both for the item and for retailers where you might purchase it.

10. Save your receipts.  You may have thought you got the best deal ever when you went shopping on Black Friday.  But maybe you didn't.  Or maybe that perfect gift wasn't perfect and now you've found the perfect gift - and it's cheaper.  Save your receipts so that you can return any unwanted items that you bought in the heat of the moment and you can bring back the items that are now cheaper at another retailer.  Plus, many retailers will credit you with the newly discounted price within a certain time period (usually two weeks) if they now sell it for a lower price.  You simply have to bring in your receipt, and they'll credit you for that amount.

I'm staying out of debt this holiday season - and beyond.  What are your tips beyond the ten I've shared here?

Wednesday, November 21, 2012

Chocolate Chip Cookie Cupcakes - Tasty Tuesday

I know, I know... it's not Tuesday.  I bet you thought I forgot about posting my usual Tuesday recipe.  Believe me, I tried.  Unfortunately, I had a stomach bug, and writing about food was painful - literally.  Fortunately, I'm feeling at least moderately better today, so I still get my post up.

This week is another focus on sweet treats.  I'm grateful that Mister Man's school doesn't only still allow students to bring in birthday treats, but the treats can be homemade.  I know this is becoming more and more rare and that there are plenty of people who have an issue with it, but we don't do sweets often, so I'm fine with it.

This year, he told me that he didn't care what kind of cupcakes I made for school "because they're always yummy, Mommy."  And he'd already put in a special request for apple cupcakes for his birthday party.  And apparently that's another recipe I need to post -  they were awesome, although some of the eight and nine year olds' palates weren't quite ready for them.

So what did I do for school?  I made chocolate chip cookie cupcakes - the best of both worlds!

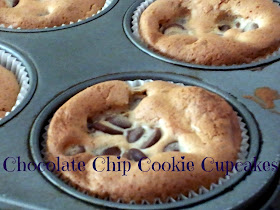
chocolate chip cookie cupcakes just baked

Chocolate Chip Cookie Cupcakes

Ingredients:
1/2 c butter
1 1/4 c brown sugar, separated
1 t vanilla, separated,
2 eggs
1/2 t baking soda
1/2 t salt
1 c flour
1 c chocolate chips

Directions:
In a bowl, beat together the butter and 3/4 c of the brown sugar until it is lightened in color and fluffy.  Add one egg and 1/2 t of vanilla, and beat again for another minute.  Add the baking soda and salt and mix again.  Add the flour and stir until just combined.  This will be much thicker than your usual cupcake batter, but you did it right - don't worry!


Set up your cupcake tins with liners, and fill each liner about half full of the cupcake batter.  Bake at 375 degrees for 15 minutes.  While these are baking, start the chocolate chip cookie topping.

In another bowl (or the same one if you're feeling like washing fewer dishes), mix together the last 1/2 cup of brown sugar, the second egg, and a pinch of salt.  Beat at high speed until it's formed almost a meringue.  This will take a few minutes, and it will be very runny.

The batter will be light and fluffy and very thin

Stir in the chocolate chips and other 1/2 teaspoon of vanilla.  When the cupcakes have finished their 15 minutes in the oven, turn the oven up to 425 degrees.  Spoon a dollop of the topping onto each cupcake.

Chocolate Chip Cookie Cupcakes ready for second bake

Bake the cupcakes at 425 for another 10 minutes.  Let the cupcakes cool in the pan before frosting.  When you frost them, keep in mind that the topping really is like a meringue and will crack if you put too much pressure on it.  Instead, pipe frosting on, or do a ganache that is really liquidy when you apply it to keep it from ruining your cupcakes.
Chocolate ganache topped chocolate chip cookie cupcakes

Yum!

Enjoy this and more with Blessed With Grace and Tempt My Tummy Tuesday.  Rachel from A Southern Fairytale has an awesome Mouthwatering Monday linkup that I participate in, too.

Monday, November 19, 2012

It's Only Superstitious If It Doesn't Work

Dear Northwestern Football,
My deepest apologies.  I am fully to blame for your three losses this year, and I regret not having done my part to ensure your victory.  Unfortunately, I didn't realize how exact I must be to guarantee a win.  I have rectified my error, however, and I promise to do my part this coming Saturday.

Do you remember when I wrote about my football nail art that I've been doing this season?  Well, apparently, it isn't good enough to simply do it.  The weeks you played Penn State and Nebraska?  Well, I was a little lazy.  For Penn State, I did the brown on Friday but finished up the manicure Saturday morning while at Mister Man's Tae Kwon Do.  And Nebraska?  I did that one completely on Saturday morning.  Michigan is the most embarrassing.  I simply forgot to do it and left on my old manicure.

I was doing the rest of it right.  I got my venti Starbucks in the morning.  I dressed in purple.  And I wore my NU football necklace and 'Cats earrings.  I've confirmed that the purple ring doesn't make a difference one way or the other, but I didn't realize how crucial the football manicure was.

NU earrings and necklace, with football nail art

This week when you played Michigan State, I made sure to complete my football manicure Friday night.  Even though I didn't get home until late, I made sure to stay up long enough to complete the football nail art and let it dry.

And it worked!  (Of course.)

I promise to ensure that I get my manicure completed this Friday before the Illinois game.  After all, it's my birthday that day, and what better present than an NU win?

Love,

Friday, November 16, 2012

My Fall Fashion Obsession

I'm not a fashion blogger.  I don't talk about what I wear and what I love, but... I do love clothes.  And shoes.  And accessories.  And call me silly, but I love listening to and reading "normal" people and what and how they put their wardrobes together more than I do fashion bloggers because I feel like the fashion bloggers are a little too out there, and I'd rather find items that I'd wear and that fit me.

So this week, Jessica McFadden of A Parent in America asks the #VlogMom question:

What are your favorite fall/winter fashion items, either already in your closet or on your shopping wish list?

And my heretofore unknown boot obsession comes to light....  But I need your help, too!


Wednesday, November 14, 2012

I Wish I Had Expat Kids

When I was eight, my family moved to Belgium.  You knew that about me, right?  No?  Well, we did, and we were there for a little over a year (not the three to five it was supposed to be, but that's a different story).  Honestly?  It was my favorite place I ever lived.

In Belgium (at least at the time), non-citizens weren't allowed to own houses, so we rented a 500 year old farmhouse.  We had a huge backyard with apple and pear trees and lived on a one lane cobblestone road - gloriously named Chemin du Bas Ransbeck in the tiny village of Ohain just outside Waterloo.  I remember the stone floors and the root cellar, the chalkboard on the kitchen wall for the daily shopping list, the lack of screen on the windows because there are no bugs, and the lack of closets in the house.

It was eye opening for an eight year old.  Not every country has closets built into the house?  You have to purchase wardrobes instead?  People go shopping on a daily basis instead of stocking up for the week (that was my mom's favorite - and she never made it to school to pick us up with a loaf of bread intact)?  And wait... they eat horse meat?  That one we discovered when my mom cooked a roast that just wouldn't bake.  It stayed pink/red and never turned brown.  After three hours, she finally threw it out, only to discover later that "cheval" means horse in French.  She was really careful about what she bought after that.

French grammar book and verb conjugation dictionary

My sister an I attended St. John's, an international school not too far from our house.  It was taught in English, but every student learned French.  I don't mean "studied" or "had a half hour class once or twice a week."  We learned it through songs and slideshows and conversations and more.  Apparently I was pretty fluent by the time we left.  And had I stayed into fourth grade, that's when they added a third language aside from English and French.  And a fourth language followed.  Did I mention that they followed the block schedule even in elementary school so that we studied our subjects in big blocks of time to get through the material without having to rush to get to the next subject?  I found that fascinating, and it was a hard adjustment when I moved back to the States.

I would move back in a heartbeat, but my husband's job isn't made for us to be expats, so the wee ones will never have the same experience I did - driving through Europe on weekends to visit Poland and Spain and West Germany (hey, it was the 80s - there was a West Germany) and more.  I saw so many things that were just normal to me that made a lasting impression.

I'm grateful that Little Miss is in a Spanish immersion program and will have the language - and a little culture - that most Americans don't receive in elementary school.  I'm happy that Mister Man takes a Spanish class once a week to at least expose him to the language.  And one day, I hope we'll be able to spend the summer renting an apartment in Europe so that they can have some of that experience.  Regardless, I'll encourage them to do a study abroad program in college if not in high school.

Because this understanding the rest of the world and where we fit into it ? It's kind of important stuff.  Have you ever lived abroad?  Would you want to - with or without kids?

Cover for The Headmaster's Wager by Vincent Lam

In the interest of full disclosure, this post is part of the From Left to Write book club where we write posts based on books we read as opposed to traditional book reviews.  I received a copy of "The Headmaster's Wager" by Vincent Lam to facilitate my post, but I was not compensated.  All opinions remain my own.

Tuesday, November 13, 2012

Apple Cider Donuts - Tasty Tuesday!

I had one cooking goal this fall.  Well, one that's specific to this fall anyway: to make apple cider donuts.  I absolutely adore them, and it's one of those treats that I buy every year.  Why I haven't made them, I don't know.  I've made pumpkin donuts before, and they aren't hard... they just make a ton of donuts.

So this past weekend, I set out to make my donuts.  I was originally going to make the traditional round donuts with the holes in them until I realized that I prefer eating the little "holes" and that the round donuts are not my friend.  Yes, this is an easy recipe - and I made it dairy free so Little Miss could enjoy it, but it wasn't originally so (see notes for the changes).

I've shared them with several of my friends, and I have half the recipe sitting in my fridge to make later today.  They're awesome.  And fun.  And oh what a special treat, right?

Plate full of apple cider donut holes

Apple Cider Donuts

Ingredients:
2 c apple cider
1 c sugar
1/4 c butter, room temperature (or butter substitute for dairy free)
1/2 c buttermilk (or rice/soy/coconut milk with about 2 T mayonnaise - trust me)
2 eggs
3 1/2 c flour
1 t baking soda
2 t baking powder
3/4 t cinnamon
3/4 t salt
1/2 t nutmeg
Additional sugar and cinnamon for rolling post frying

Directions:
Reduce the apple cider.  This will take about a half hour or more, and you can do it in advance then stick it in the fridge for when you're ready to make donuts.  My husband also decided this was a really good topping for ice cream.  Just sayin'.  Boil the apple cider until it's reduced to about 1/4 cup.  It will be slightly thicker and much darker than when it started, but don't burn it.

Jar of reduced apple cider for apple cider donuts

When you're ready to make the donuts themselves, measure out the butter and place it into a mixing bowl.  Personally, I love using my special liquid/dry measuring cup for items like butter that tend to stick in a regular measuring cup - honey, mayonnaise, etc are much easier in this, too.

Pampered Chef liquid/dry measuring cup with butter inside

Beat the butter with the sugar, just like your normal baking recipe.  Add the eggs, one at a time, and beat well until combined.  Add the reduced cider and buttermilk, and beat again.   Add the cinnamon, baking powder, baking soda, salt, and nutmeg, then mix until fully incorporated.

Dry ingredients added to apple cider donuts

At about this point, you'll want to start heating your oil.  You want a wide pan, deep enough to hold a couple inches of oil.  Heat on medium high to 350 degrees.

While the oil is heating, add the flour and stir until just combined.  Flour your working surface with extra flour, and pull out a clump of dough.  Carefully roll it in the flour until you can work with it and create a snake like you did in kindergarten with clay.  Using a knife or a board scraper, cut off half inch sections of dough.

When you think the oil is hot enough, drop in a test dough ball.  You want it to immediately start bubbling around your dough.  If it doesn't, your oil isn't hot enough.  Pull it out, and try again in a few minutes.

When bubbles form, the oil is hot enough to fry donuts

Place several donuts at a time, but be sure there is plenty of room for them to move and expand.  They will take only a minute or so to fry on each side before you need to flip them over.  A fork or slotted spoon or chopstick works perfectly for this.

While they are frying on the first side, prepare your finishing station.  On a cookie sheet, place a wire rack.  Atop the wire rack, lay paper towels so that the grease can fully drain from the donuts.  Prepare a bowl with 1 c sugar and 2 t cinnamon to roll your donuts in after they've drained for a few minutes.

Paper towels on a wire rack over a cookie sheet to drain donuts after frying

Now you're ready to start the assembly line.  Fry a few, flip.  Add some more while the first ones are frying on their second side.  You'll know they're ready to flip when the bubbles start reaching the top of the donut and the sides are a beautiful golden brown.

Donuts are ready to flip when they are golden brown around the edges

Pull them out with a slotted spoon when they're done, and add some more.  Let the donuts cool and drain for a few minutes before rolling them in the cinnamon sugar and placing them on a separate plate. Keep frying, rolling more donuts, flipping, and draining until the donut dough is all gone.

The donuts are awesome still warm, but they will keep in a tightly sealed container with a paper towel under them once they've cooled for up to three days.  If they last that long.  If you don't want to make all your donuts at once, you can refrigerate your dough for a couple days.  Make sure you bring it to room temperature - or close - before you fry them, though.  If batter is too cold, it will absorb the grease before frying and will be a much heavier and not as yummy donut.

Enjoy this and more with Blessed With Grace and Tempt My Tummy Tuesday.  Rachel from A Southern Fairytale has an awesome Mouthwatering Monday linkup that I participate in, too.

Monday, November 12, 2012

Future Romance Writer

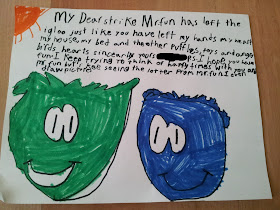
This morning, as the wee ones were waiting for the bus, I walked into the homework room to straighten things up just a little.  I can usually find one or two pieces of paper that need to be recycled amongst the detritus, and I sneak it out when they aren't looking.  This morning, I found a letter Little Miss wrote to one of her puffles.  And I'm not sure if I'm impressed or a little disturbed.

I do know a little of the back story.  Puffles are little furball stuffed animals the wee ones love from Disney's Club Penguin.  They each have a few of the stuffed animals as souvenirs from our trips to Disney, and they have a ton of fun with them from running "Camp Puffle" to celebrating their birthdays. Recently, Little Miss brought her three Puffles to school and shared them with friends for the night.  Needless to say, I put the kibosh on this as soon as I learned they were out of the house, but one Puffle is still at a child's house for a "two week vacation."  He's supposed to come back today, but I don't have much faith.  That said, it isn't a bad lesson for the wee ones.

So I'm guessing that's where this letter came from.  I promise that since she doesn't watch tv, and I watch any movie with her, I know this isn't something she's picked up elsewhere.  I hope.  I'm going to talk to her tonight to get a sense of where this letter came from.

Little miss's Love letter to her puffle


My Dear Strike,  
Mr. Fun has left the igloo, just like you have left my hands, my heart, my house, my bed, and the other Puffles, toys, and Angry Birds' hearts.  
Sincerely yours,
Little Miss
PS I hope you have fun.  I keep trying to think of happy times with you and Mr. Fun, but I keep seeing the letter from Mr. Fun.  I even draw pictures.
(Yes, I edited for clarity.)  So should I be worried?  Or should I just enroll her in the creative writing summer camps and encourage this newfound talent for trashy novel writing?

Friday, November 9, 2012

My Lack Of A Life List

People talk about bucket lists all the time.  In fact, I'll frequently see a page on blogs that has that person's bucket list with the accomplished items crossed out.  I admire that.  I used to have a spreadsheet with... well, watch the video and see.

This week's #VlogMom prompt comes from Jessica at Look Who Found the Marbles.  She asks about our bucket lists, or as she calls them, our life lists.

Do you have a life list?  What are the three items you most want to cross off your list, and why?


So how about you?  What are the items on your bucket list?  Inspire me!  And then go see what the other Vlog Moms have to say.


Thursday, November 8, 2012

BlogHer Book Club: Reflected In You

If you haven't figured this out by now, I love to read.  I love reading books I wouldn't normally pick up, partly because I've exhausted my favorite writers.  And their favorite writers.  Reflected in You by Sylvia Day is probably not one of the books I would have picked up on my own, even though it is currently the #1 New York Times bestseller.

Cover of Reflected in You, the second Crossfire novel

Reflected in You is the second novel in the Crossfire series, featuring Gideon Cross - another mid-twenties billionaire who owns companies with a twisted past - and Eva Tramell, who has recently graduated college and is working her first job in Manhattan - and of course she comes with a twisted past of her own.  Sound somewhat familiar?

It actually has its own nuances and is a different story from the 50 Shades books, though there it falls into the same erotic genre - sans naughty play - with the disparity in power of the relationship.  Eva, however, comes from money on her mother's side and has a best friend she lives with in her spacious apartment, paid for by her stepfather.  I had similar queasy stomach issues reading this book and seeing the decisions that the characters would make as I have in reading similar novels.

That said, I'm awaiting the next Crossfire novel (and I'm slightly ashamed to admit that).  I did read the first novel in the series, Bared to You, prior to reading Reflected in You, but the book has enough backstory that you can read the second novel without having read the first.  The first does provide much of the detail that helps the second flow more smoothly, however.

I have never been in a relationship that started with all-consuming passion from the first moment, where there is a question of where the line between obsession and caring needs to be drawn.  And I have certainly never been in a relationship with such a power discrepancy, nor where the passion/obsession has been maintained at such a high level for so long.

It worries me a little to think that young adults might view this as a typical or expected relationship, when there is so much about it that is unhealthy - both individually amongst the characters and with their relationships.  That was hard to close my mind to as I was reading because I worry about the wee ones as they grow older and develop their own relationships, not just romantically but with friends.  And all those relationships are pretty messed up, too, in this book.

And fortunately, this book is more about the relationships amongst the characters and less about the raw carnality, which makes it a much easier read for me.  I'll admit that I get bored when there is more intercourse than story.  And Reflected in You certainly has plenty of story, disturbing as much of it is.

Have you read either of the Crossfire novels?  Do you plan to?  Regardless, jump in with the BlogHer Book Club discussion.  This week, we're talking about how we recharge when life is too overwhelming.  I certainly can't afford to jet off to Vegas or have a spa come to my home for a day of pampering, but I find my ways.  Share with us what you do!

In the interest of full disclosure, I received a copy of the Crossfire novels for review purposes.  I am also compensated for participating in this campaign. That said, all opinions remain my own.

Wednesday, November 7, 2012

How To Do A Football Manicure

I love football.  And when I saw that one of my friends had posted a photo of the most awesome - and timely - manicure ever, I knew I had to figure out how to do it myself.  Headless Mom had a football manicure, and it was awesome.

I may have never done any sort of nail art myself at all, but it couldn't be that hard, right?  It actually isn't.  I've been giving myself this manicure since the first week of the college football season, and I've figured out how to - and how not to - do the football manicure.  I am constantly stopped by people admiring my nails, and it's fun.

Photo of football nail art

I've figured out that the nails don't have to be perfect to get the effect across.  I'm the only one who looks at them with a magnifying glass and sees every imperfection.  Everyone else sees them and just thinks they look really cool - from at least a couple feet away.

Football Nail Art Steps

The most important thing is to choose the right polish.  You want a toffee football brown, which is very doable.  When you look at the polish, look at the chips by the display and not what's in the bottle.  You'll notice that what is in the bottle looks a ton lighter than what shows on my fingers.  And because it's a dark color, the second coat makes a huge difference.  I was skeptical the first time I put on my first coat, but it's the right color!

The color in the bottle looks way lighter than what is on my nails

In total, you will need three polishes: the toffee brown, a white nail art (not regular white - see below), and a clear polish with a thick brush.

White, brown and clear polishes for football nail art

Step 1:
Obviously, paint your nails brown in two coats just like you would with a normal manicure.  After you've shaped your nails and pushed back your cuticles, of course!

Nails after two coats of brown polish
See, totally different color brown than what's in the bottle!

Step 2:
Once your brown coats have dried to a degree, you'll be ready to do your white nail art.  Pull the brush from the bottle, and ensure that any extra polish that is higher up on the brush's stick is discarded on the edge of the lid so it doesn't drip down while you're painting.  You then want to drag the brush against that same edge, removing most of the polish from a "front" and a "back" which will create a flatter surface.  Turn the brush a quarter turn,  and use that sharp edge to do the painting.

Do just the long side of the laces first.  I've found that the easiest way to do this to create and even and a straight line is to place the tip of the brush on the back of a nail, then pull your hand straight back instead of trying to move your brush hand.  You end up with a much better line that way.

Nails with just the long side of the lace

Step 3:
Create the short side of the laces.  Again, use the same technique for the short side of the laces as for the long side.  Be sure your hand is angled the right way for this, as otherwise you'll have the short laces at an angle to the long laces instead of perpendicular, and it doesn't look quite right.  I'm still perfecting this part.  Make them much shorter than you'd think you need to - see below for the why!

Football nail art with full laces

Step 4:
Place your clear coat atop the laces.  You have to be careful with this step.  This is where the thick brush is a necessity.  You want much more clear polish on the brush than you normally use.  You want only the polish touching your nails, with the brush above the polish moving it.  If you aren't careful, the brush will pull the white polish and smudge the beautiful laces you just created.  You also want to be sure to do no more than three strokes to cover your nails with clear polish - once in the middle and then once on either side, being careful each time not to smudge the white.

And voila!  These nails are super easy and create a ton of fun attention - and support for the sport you love.

How Not To Do Football Nail Art

The steps are fairly easy, and I've also figured out what doesn't work.  The first time I did it, my dad saw my nails and asked if they were Christmas trees.  Or if they were Chinese characters.  Obviously I had a little work to do.  That said, most other people knew they were footballs; my dad's a little oblivious.

I had purchased white nail polish, and I used the end of a toothpick to apply the laces.  The toothpick holds onto too much polish, so it ends up too thick.  After showing this to a few friends, they told me about nail art polish.  It's regular polish that is in a bottle with an extra thin brush.  I picked that up, and it made all the difference in the world.  Another friend suggested using a thin paint marker, which I'm guessing would also work.  Just... don't use the toothpick.  See?

A toothpick makes the laces too thick for football nail art

I also experimented with a variety of laces.  I always did at least three, and I experimented with doing four and five on nails.  If I were really good and could keep the polish lines as consistently thin as professionals do, I think doing five laces would be perfect, depending on your nail length.  For me, whether my nails are longer or shorter (or both at the same time - I'm tacky like that), three laces looked the best.  See?  They look silly.  This was also my first shot with the nail art brush, and I was still learning.

Four or five lines is too many laces for my football nail art

You can also see from the photo above that I would press down with the brush on one side and then slide it across and lift.  It didn't give an even look.  Using just the bare tip of the nail art brush made a big difference.

Additionally, I started out making my laces too wide.  In the photo above, the thumb has the right proportion.  Most of the others are too long on the laces.  Making them shorter than I thought I should actually looks much better.  It's easy to add more polish if needed.  It isn't so easy to take it off.

So what do you think?  Is this not the coolest idea ever?  What is your favorite way to paint your nails? I'm ready to branch out and try something new once football is over.  Maybe I'll really do Christmas trees and surprise my dad....

Tuesday, November 6, 2012

Tortilla Soup - Tasty Tuesday!

So yes, I've posted a tortilla soup recipe before.  And it's good.  But I gotta say, this one is way easier. And just as yummy.  And the wee ones liked it better, possibly because I put fewer "spicy" ingredients in it.

This is one of those "recipes" that I made in desperation.  I knew I was going to be running around all yesterday afternoon and was going to walk in the door long enough to drop the wee ones off for dinner before heading out again.  Welcome to my life.  If I didn't want them eating fast food (and I didn't), I'd have to have dinner ready for my husband.  That meant something in the crock pot, and that's where I drew a blank.

I literally tossed four frozen chicken breasts into the crock pot while I debated what to make.  I had tomatoes, so I added two cans of that.  And some chicken broth.  Before I knew it, I'd made tortilla soup with less than five minutes' prep time.  No joke.

Of course, neither of the wee ones would want to try it if they knew what was in there.  My secret?  I had them close their eyes and then smell the deliciousness wafting from the crock pot.  Both agreed it smelled awesome.  And voila, they tried, ate, and loved the soup.  Yay!

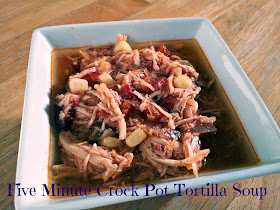
Bowl of the easiest and yummiest tortilla soup yet

Yes, I have a photo of the soup in a bowl.  I don't have any photos of me making it because, honestly, they aren't pretty.  And this is so easy that it doesn't even need photos.  Seriously.

Crock Pot Tortilla Soup

Ingredients:
4 chicken good size chicken breasts - yes, I used frozen because it's what I had; use fresh or frozen
2 cans diced tomatoes, the 14.5 ounce size
3 c chicken broth
1 can enchilada sauce - I used mild because it was for the wee ones, but use your favorite
1 onion, chopped
4 cloves garlic, minced
2 c frozen corn
2 t salt
1 1/2 t cumin
2 tortillas
oil
Optional: chilis, 1 t chili powder, juice of a lemon

Directions:
Seriously.  This is the easiest ever.  Put your chicken in the crock pot.  Add the tomatoes.  Add the chicken broth.  Chop your onion and add it.  Dice  your garlic and add it.  Add the enchilada sauce.  Cover and cook on low for 6 to 8 hours or me version: on high for four hours (because I had the frozen chicken, remember?) then on low for 2 hours after that.

Pull the chicken from the soup, and gently shred it.  The meat will literally fall apart, it's so tender and yummy.  I just used the back of a spatula to shred it.  Add the chicken to the crock pot again, and add the cumin, then stir.  Add your corn and salt, and stir again and you're done.

If you're using the optional ingredients, go ahead and add the chilis and/or chili powder at the beginning.  The lime juice gets added just before serving.  What else would you include?

To add the tortilla strips to make it truly a tortilla soup, brush them lightly with oil.  Place one atop the other and cut into thin strips, then cut the strips into the length you like.  Place them on a baking sheet covered in parchment paper or a sil pat.  Bake at 375 degrees for 10-15 minutes until they're browning and crispy.  Place them atop your soup as you serve it (if you like sour cream, I've heard that's good, too, but it's never in my house because I don't like it personally).  You can store the extras on the counter in a sealed container for 3 days or so.

Enjoy this and more with Blessed With Grace and Tempt My Tummy Tuesday.  Rachel from A Southern Fairytale has an awesome Mouthwatering Monday linkup that I participate in, too.

Thursday, November 1, 2012

Halloween: Where Girls Can Be Boys

So apparently it's Halloween week on my blog.  Go figure.  With all the counting down the number of days before it gets here by the wee ones, I suppose I shouldn't be surprised.  They've long outgrown the stage where I can choose their costumes for them, so no more being a lion for two years then passing it to the next child to reuse the costume again.

The wee ones at least haven't changed their mind 18 kajillion times before Halloween itself, so I suppose I should be grateful for that.  This year, we had a ninja and Spiderman.

Mister Man giggling about his awesome skull ninja costume

Spiderman is strong, right?

A Strong pose for a strong SpiderMan

Yes, Spiderman has a strong personality....

Surprise, the strong Spiderman is a girl

So how long can she dress in a costume of her choice?  And more importantly, what did you (and your kids) dress up as for Halloween?


Wednesday, October 31, 2012

Allergy Free Trick Or Treating - Or Not.

While the wee ones love all parts of Halloween, there's a few small sticking points for us.  The candy is the big one, as Little Miss has a dairy allergy, and none of us eat HFCS, plus we avoid dyes and other nasties.  That limits the candy we end up eating each year, which isn't necessarily a bad thing.

It's hard for the wee ones - especially Little Miss who usually ends up with just a few bags of pretzels - and I always have a stock of "trade" items on hand that are treats I know they can eat.  We're lucky, though.  A local organization put together an allergen free trick or treat for the special needs children in the area, knowing that so many are on restricted diets and can eat none of the candy they collect.

It's a brilliant idea, and I love that the neighborhood bands together to do this.  They even have tables at the ends of their driveways for the most part so the kids can trick or treat more easily instead of having to go all the way up to each of the houses.  One neighbor also creates an incredible haunted house for the kids to go through - altering the scary factor based on the requests of the kids going through in each wave.  This year, one person even rented a giant bouncy house so the kids could play once they finished trick or treating.

Except...

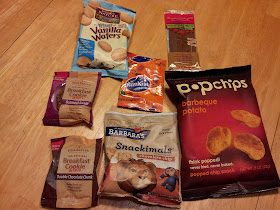
Here's where I start to feel ungrateful.  There were eight houses participating this year.  That isn't the issue.  My irritation - and I feel slightly justified in it because this was advertised as allergen free - is that this is what we collected from the eight houses:

Treats collected from the allergen free trick or treat that weren't allergen free

So the most common allergens are peanuts, wheat, dairy, eggs, soy, fish, shellfish, and tree nuts.  Many more children have issues with corn, even though it isn't in the major 8 - yet.  In fact, companies are now required to label when their products have any of the big four: nuts, wheat, dairy or soy.  Most of the special needs children are on the spectrum (including Mister Man), and many of those are on gluten free, dairy free diets.  More avoid HFCS and dyes, including many who are diagnosed with ADHD.

I appreciate that many of the houses decided to go "natural" for the allergen free trick or treating.  But they missed the boat.  Natural is not allergen free.

The Pop Chips contain dairy.  The Barbara's contains wheat and soy and is produced in a factory with milk, eggs, peanuts, hazelnuts, almonds, pecans, pistachios, cashews, walnuts, and coconut.  The breakfast cookies contain wheat, soy, eggs, and are produced in a factory with wheat, peanuts, tree nuts, soy, eggs, and dairy.  The Back to Nature contains wheat, egg, milk, and soy.  The Sunkist "fruit flavored" snacks?  There's no ingredient listing on them, but I can tell you that fruit flavored snacks will contain HFCS and dyes.

So of the eight items we collected - oh, they also handed out prepopped popcorn in bags that contained dairy, wheat, and soy, I forgot that one - Little Miss can have one.  The big event that she's most excited about because she can actually eat the treats she collects was a bust because unfortunately people don't understand allergies.  She was inconsolable, and I don't blame her.  She was looking forward to this for weeks.

And I feel like a complete schmo for complaining, but... it's advertised as an allergen free trick or treat, and it wasn't anything of the kind.  And she's my neurotypical kid.  Try explaining to a more profoundly impacted child that the candy they can eat... they can't now.  It was so disappointing and so unnecessarily so.

The concept is brilliant.  And Surf Sweets has great allergen free candy.  So does Yummy Earth.  Indie Candy makes wonderful allergen free candy.  Strawberry Hill sells all kinds of allergen free candies.  There's even Glee Gum that is an allergy free alternative.  And that's just a small sampling of the companies I buy from regularly that I know are allergy free.  There's a ton more out there.  None of it was included in what the houses handed out this year, but it could have been if there was better education of what allergen free means.

I love the idea.  I love that the neighbors are willing to do this special event.  But creating the special event and then providing items that the children can't enjoy makes it worse than not having it at all.  Because they're kids.  And they don't get why they can't enjoy an event created for them.  Next year, we may not go because I don't want the wee ones to have this disappointment again - and I can't take on another project so it gets done right (so I say now; watch, I'll end up spearheading this in another eight months).

Because we have allergies in our house and because we know so many who have severe allergies, we always provide an alternative to traditional candy.  I wrote Monday about the book or treat option I'm having this year.  And I'm passing our Plants vs. Zombies trading cards.  And we have a small stash of "special" allergen free candy for those who request it.

What do you hand out for Halloween?  Do you have children with allergies?  How do you handle it if you do?

Updated: I have since found out that the treats that were provided by the neighbors for the special needs allergy free trick or treat was purchased by the special needs organization that arranged this.  So the people who put it together who are supposed to be smart about this and advertised it as allergy free were the ones who provided the treats that absolutely were not allergy free.  I've moved past disappointed to disgusted and very sad.  These are people who are supposed to know better!

Tuesday, October 30, 2012

Cream Of Celery Soup - Tasty Tuesday!

It's cold in Chicago now.  Our beautiful days of sunshine and 70s are gone.  It's no longer easy, comfortable, or even possible to go outside without a coat.  In my mind, we've officially entered Soup Season.  Earlier this week, I made my Roasted Butternut Squash Soup, and it was good.  Last night, I did a new one, and it was awesomely yummy and again perfectly healthy.

Interestingly, my Cream of Celery Soup doesn't require any cream or milk.  And since I was in the process of doing a 14 day gluten free challenge, I was happy to make this gluten free, too.  Potato does an amazing job of making a beautiful thick texture and a creamy taste.  I've used this technique before with my potato and corn chowder that has barely any milk in it.  It feels wrong calling it "cream of" when there's no cream or milk, but this is exactly what it tastes like.

And this soup was good.  Even my husband who doesn't like celery ate it, and Little Miss kept taking spoonfuls from my bowl after she finished hers.  That's a good sign, right?

Bowl of cream of celery soup

Cream of Celery Soup

Ingredients:
6 good size celery stalks (about a pound, but my digital scale broke, so I'm guesstimating)
1 medium baking potato
2 T oil or butter
1 medium onion
2 cloves garlic
3/4 c dry wine
4 c chicken stock (or vegetable stock to make vegan)
1/2 t nutmeg
salt and pepper to taste

Directions:
Chop your celery into small pieces.  I cut my stalks in half lengthwise (after washing them well) and then chopped them into 1/2 inch pieces or so.  In a heavy soup pan, heat the oil (or butter).  Add the celery and cook over medium low heat.  Stir, then chop the onion after peeling it. The onion should be about the same size as the celery.  Add the onion to the pot and continue to cook.

Cut the potato into similar small chunks.  Personally, I like keeping the potato skin on, so I don't peel it.  If you feel differently, go ahead and peel it.  You want these smaller than you normally would so that they cook more quickly in the soup.

Cut potato into fairly small pieces for cream of celery soup

Smash the garlic and remove the skins.  Add the smashed garlic to the onions and celery and cook for a few more minutes, stirring periodically.  You want to cook it until the onion is fairly translucent but before it truly caramelizes.  At this point, add the wine, and cook it down until the wine has reduced by about half.

Cook the onion and celery until the wine is about half reduced

Add the potato after the wine has reduced, which will only take a few minutes.  Then add the chicken stock - adding the potato first means you don't get splashes of stock.  I'm always thinking, and no, I didn't learn that one the hard way, why?  Add the nutmeg, and stir once.

Bring this to a boil (cover it to bring it to a boil more quickly, then remove the cover once it boils), then turn it down to a simmer.  Cook for 15-20 minutes when the potatoes are soft but not mushy.

Use your immersion blender - still my favorite kitchen gadget - to puree the soup.  If you don't have an immersion blender, you can use your regular blender.  You'll puree it in batches.  Don't fill your blender more than one-third full of a hot liquid, and be sure to use a kitchen towel to hold the lid on.  You don't want the pressure from blending hot liquid to case the top to fly off and spray scalding liquid, so be careful (see, this is why I love my immersion blender - it reduces danger, and it's useful).

The immersion blender makes pureeing the cream of celery soup easy

Add salt and pepper to taste, and serve immediately.  This is fantastic, even for me who doesn't like celery.  It's a light, fresh and slightly sweet flavor that is a perfect fall dinner.  Because this is such a light soup, it may work better as part of a meal rather than the entire entree.

Enjoy this and more with Blessed With Grace and Tempt My Tummy Tuesday.  Rachel from A Southern Fairytale has an awesome Mouthwatering Monday linkup that I participate in, too.